OpenCV settings on Mac
Install homebrew
Type the following directions to install homebrew
ruby -e "$(curl -fsSL https://raw.githubusercontent.com/Homebrew/install/master/install)"
Install OpenCV
After installing homebrew, we just need to type the following direction to install OpenCV
brew install opencv
It will not always works well. There may be kind of mistakes and I just encounter the such in the process. I just could not finish the installation of libpng, and I found that it was prevented by the man’s trigger. The file man5 has been already allocated by other programs with the permission admin, so I used sudo chown $USER man5 to solve this problem. And then I went on with the instruction of brew link libpng.
Here, OpenCV has already been installed.
Settings and make a demo
Now All the dylibs is in /usr/local/lib, we need add them to our projects.
- New a command line project in Xcode
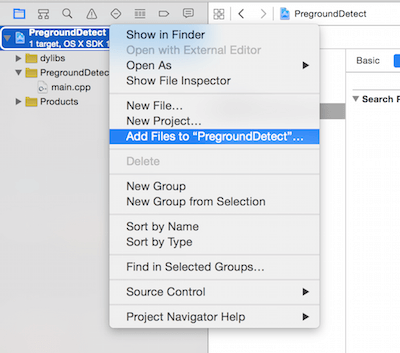
Select the Project and choose Add Files to …

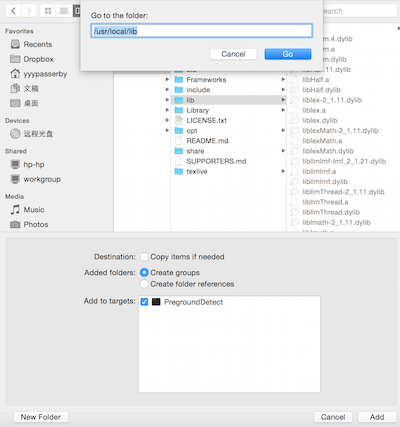
Command + Shift + Gto type the directory of our dylibs as above/usr/local/lib.
Choose all the dylibs under this directory and click Add.
Click the settings and choose Target, select All option on the right side and type Header Search Path in the search. Add these two lines in the section.
/usr/local/include
/usr/local/include/opencv
Add
/usr/local/libto the Library Search Path- Try the following code in your
main.cpp, see how it works!
#include <opencv2/opencv.hpp>
#include <opencv2/highgui/highgui.hpp>
#include <opencv/cvaux.hpp>

using namespace cv;

int main(int argc, const char * argv[])
{
    VideoCapture cap(0);
    if(!cap.isOpened()) {
        return -1;
    }
    Mat edges;
    namedWindow("Source", 1);
    for(;;) {
        Mat frame;
        cap >> frame;
        //resize(frame, frame, Size(320, 320));
        pyrDown(frame, frame);
        cvtColor(frame, frame, CV_BGR2GRAY);
        GaussianBlur(frame, frame, Size(7, 7), 1.5, 1.5);
        imshow("Source", frame);
        if(waitKey(30) >= 0)
            break;
    }
    return 0;
}